Augmatic GRE
User Manual
Version 1.0 - 2026-02-15.
AUv3 MIDI Drum Pattern Generator for iPad, iPhone and macOS.
Contents
Introduction
Augmatic GRE generates evolving drum patterns using proven musical algorithms. Morph through endless rhythmic variations that naturally balance simplicity and complexity — without tedious manual programming.
Augmatic GRE is an AUv3 plugin and standalone app that generates MIDI notes for any software or hardware drum sampler or synth that accepts MIDI input. It does not produce audio.
Main Features
- 6 algorithmic channels — bass drum, snare, hi‑hat, plus accent and ghost variations
- Grids engine — for morphable, evolving beats — based on the Mutable Instruments module
- Euclidean engine — for evenly distributed, world‑rhythm patterns
- Blend control — to mix Grids and Euclidean styles
- Linear Drumming — no two drum hits occur at the same time
- Velocity Bender — for a more expressive, dynamic pulse
- Groove tools — swing, humanization, clock division, and timing shift
Instrument Channels
| Channel | Label | Default Name | Purpose |
|---|---|---|---|
| 1 | BD | Bass Drum | Primary bass drum — drives the main beat |
| 2 | SN | Snare | Primary snare — drives the backbeat |
| 3 | HH | Hi-Hat | Primary hi-hat — drives the pulse |
| 4 | BD' | BD Accent | Independent bass drum accent — ghost notes, rimshots (own density/chaos) |
| 5 | SN' | SN Accent | Independent snare accent — ghost hits, cross-sticks (own density/chaos) |
| 6 | HH' | HH Accent | Independent hi-hat accent — open hats, bells (own density/chaos) |
Each channel can use either of two pattern engines:
- Grids Engine — Based on the Mutable Instruments Grids Eurorack module. Morphs between 25 pre-programmed drum patterns using X/Y coordinates.
- Euclidean Sequencer — Distributes pulses evenly across steps using the Bjorklund algorithm. Produces rhythms found in traditional music worldwide.
Both engines run in parallel. A per-channel Blend control mixes between them, and you can assign different engines to different channels.
Compatible Hosts
Augmatic GRE is an AUv3 MIDI Processor (aumi type) that generates MIDI drum patterns. It works with any compatible AUv3 host, including AUM, Cubasis 3, Drambo, and Loopy Pro.
Load it as an Instrument, then route its MIDI output to a drum sampler or synthesizer on another track.
Getting Started
- Install — Download Augmatic GRE from the App Store
- Launch the standalone app once — this registers the AUv3 extension with the system
- Open your host (Logic Pro, AUM, Cubasis, etc.)
- Add Augmatic GRE in a MIDI effect or MIDI source slot
- Route MIDI output to a drum instrument (sampler, drum machine, etc.)
- Press Play in your host — patterns generate and MIDI notes flow to your instrument
The plugin syncs to your host's transport: BPM, play/stop, and timeline position. All parameters can be automated from your DAW.
Interface Overview
The plugin interface has four tabs: Pattern, Linear, Velocity, and Settings.
The left side of the interface contains:
- Preset panel (top) — load, save, and navigate presets
- X/Y Pad (center) — tap and drag to control Grids Map X / Map Y in two dimensions
The right side shows the active tab's controls, organized as a grid with one row per instrument channel (BD, SN, HH, BD', SN', HH').
X/Y Pad
X/Y are global controls that affect all drum channels simultaneously. They select a position within the Grids pattern map — a 5×5 grid of 25 pattern nodes. Changing X/Y changes the underlying rhythmic character of every channel (BD, SD, HH, BD', SD', HH') at once. Values between grid points blend adjacent patterns smoothly.
All other controls on the Pattern tab — Density, Chaos, Blend, Euclidean parameters, Swing, Shift, Humanize, and Clock Divider — are individual per channel, allowing you to shape each drum voice independently.
Pattern Tab
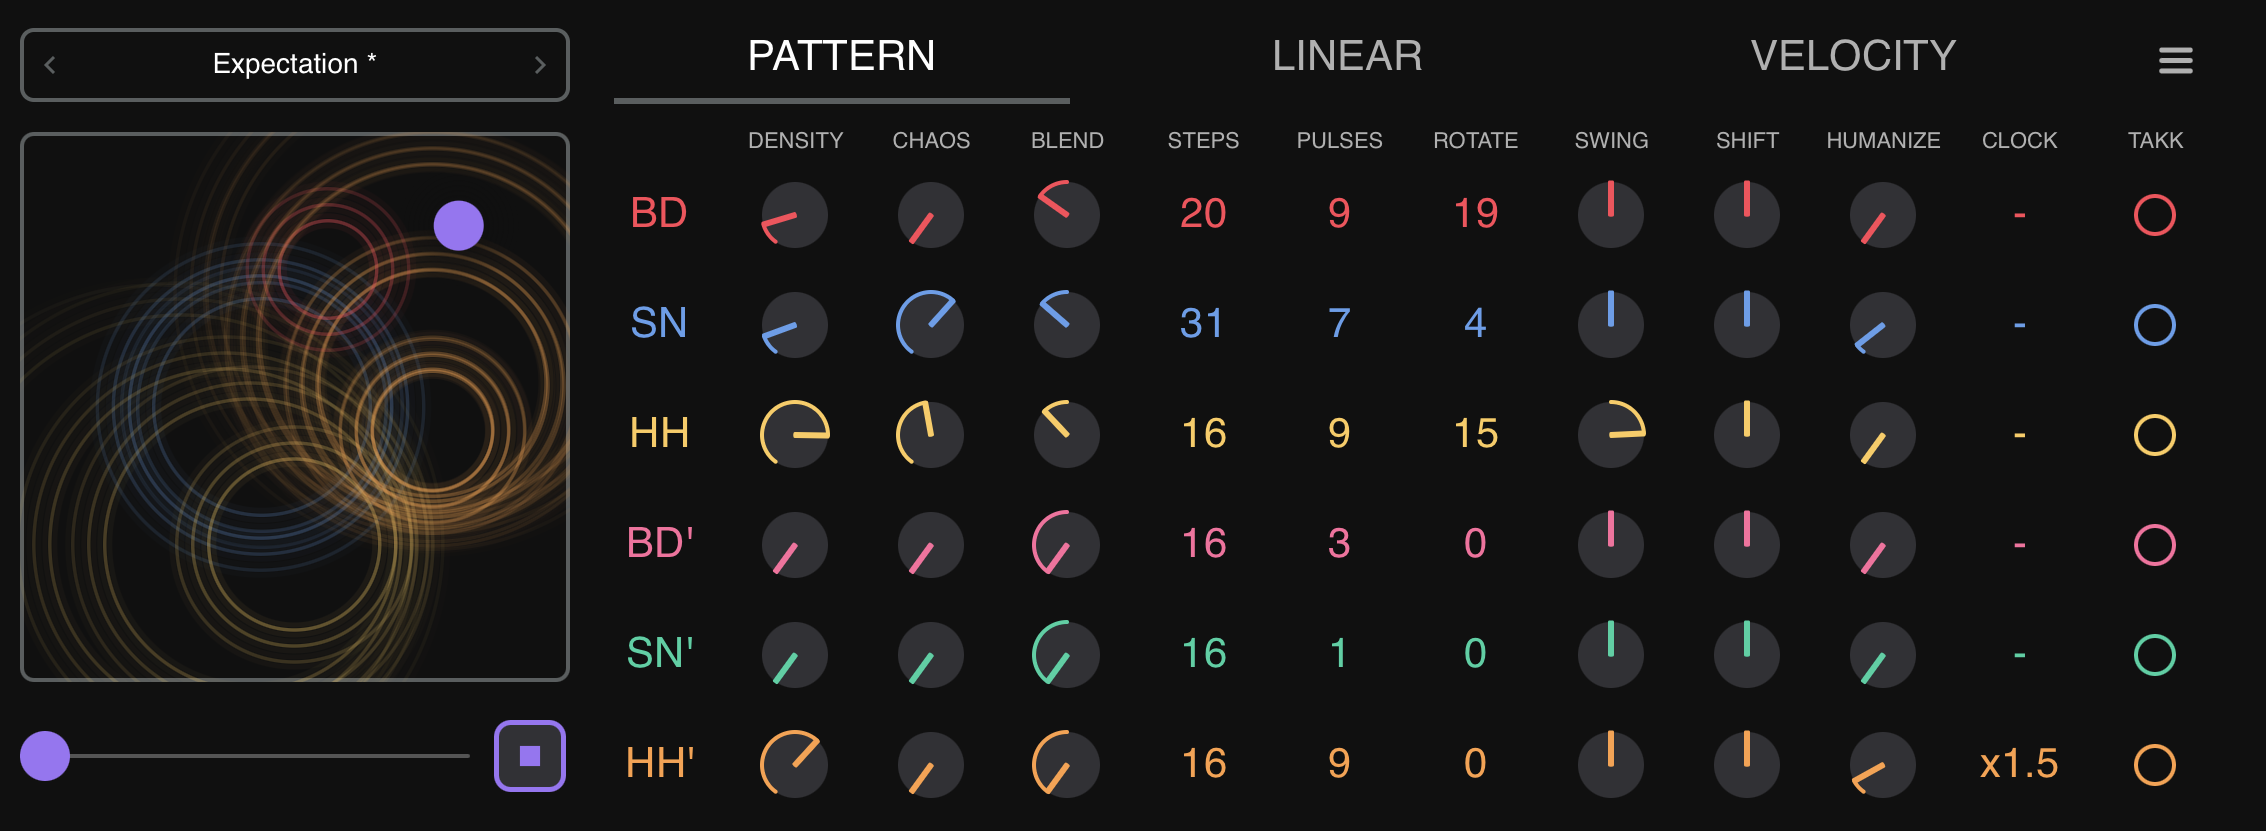
The PATTERN tab controls how drum patterns are generated. Each instrument channel has independent controls across multiple columns.
Grids Engine
The Grids engine is a faithful port of the Mutable Instruments Grids Eurorack module. It contains 25 pre-programmed pattern nodes arranged in a 5×5 grid. Each node stores three distinct rhythmic layers — bass drum, snare, and hi-hat — designed to work together musically.
When you move the X/Y coordinates, the engine smoothly blends between the four surrounding nodes using bilinear interpolation, creating an infinite continuum of rhythmic variations. The nodes are arranged in a curated musical topology, so adjacent positions morph between complementary drum styles rather than jumping abruptly.
Each step in a pattern has a level value (0–127) that represents how strongly that drum hit “wants” to play. The Density control acts as a threshold: only steps whose level exceeds the threshold will trigger. This is why increasing Density gradually adds hits in a musically meaningful order — the strongest beats appear first, then fills and ghost notes emerge as you push higher.
Main and Accent Channels
Augmatic GRE runs six independent Grids instances — one per channel. All six share the same X/Y position and draw from the same pattern data, but each has its own Density and Chaos controls.
This means accent channels produce complementary rhythms, not duplicates. At the same X/Y position, a BD' accent with Density 20 triggers different steps than the main BD with Density 64, because the density threshold filters different hits from the same underlying pattern. The strongest beats play on the main channel; the weaker, in-between hits emerge on the accent channel.
- Main channels (BD, SN, HH) — carry the primary beat. Set Density to taste (typically 40–90).
- Accent channels (BD', SN', HH') — add ghost notes, rimshots, or alternative articulations. Default Density is 0 (silent). Increase to 10–25 to start hearing accents.
Assign accent channels to different MIDI notes than their parent (e.g., BD=bass drum, BD'=rimshot) to trigger alternative drum sounds on the accent hits.
Density
Controls how many notes each instrument generates. Higher density = more notes.
- 0: No notes
- 64: Medium density (roughly half the available pattern steps trigger)
- 127: Maximum density (all available steps trigger)
Accent channels default to 0. Increase them to 10–25 to start hearing accent notes.
Chaos
Adds controlled randomness to patterns, creating variations in timing and velocity.
- Master Chaos slider (0–127, default 0): Master override. When changed, sets ALL individual chaos values to match.
- Per-channel Chaos (0–127, default 0): Independent control per instrument.
Impact of Chaos control:
- 0: Mechanical precision, no variation
- 5–15: Subtle humanization
- 30–50: Noticeable groove variation
- 80–127: Unpredictable, experimental
Important: Master Chaos slider is a write-only override. Adjusting it overwrites all individual chaos values. To set different chaos per channel, leave Master Chaos slider at 0 and use the individual controls.
Blend (Grids / Euclidean)
A per-channel control that mixes between the two pattern engines:
- 0.0 (left): 100% Grids Engine
- 0.5 (center): 50/50 mix — each note randomly picks from either engine
- 1.0 (right): 100% Euclidean Sequencer
Default: 0.0 (Grids) for all channels.
Euclidean Engine
Each channel has three Euclidean parameters:
- Steps (2–32, default 16): Pattern length in 16th notes
- Pulses (0 to Steps, default 4): Number of hits distributed evenly across the pattern
- Start On (1 to Steps, default 1): Which step the pattern starts on. Start On = 1 means the first hit lands on beat 1 (no shift). Start On = N shifts the pattern to the right so the first hit lands on step N.
The Bjorklund algorithm distributes pulses as evenly as possible, creating rhythms found in traditional music:
| Notation | Steps | Pulses | Style | Description |
|---|---|---|---|---|
| E(3,8) | 8 | 3 | Cuban | Tresillo — fundamental Cuban rhythm |
| E(5,8) | 8 | 5 | Afro-Cuban | Cinquillo — classic clave-like pattern |
| E(5,12) | 12 | 5 | Afro-Cuban | Son clave variation |
| E(7,12) | 12 | 7 | West African | Traditional bell pattern |
| E(5,16) | 16 | 5 | Latin | Rumba clave stretched to 16 steps |
| E(7,16) | 16 | 7 | Modern | Dense, complex polyrhythm |
| E(5,13) | 13 | 5 | West African | Classic African bell pattern |
| E(9,16) | 16 | 9 | Electronic | Modern electronic pattern |
Visual pattern examples:
E(4,16) Start On=1:  X . . . X . . . X . . . X . . .
E(4,16) Start On=3:  . . X . . . X . . . X . . . X .
E(3,8)  Start On=1:  X . . X . . X .
E(1,16) Start On=1:  X . . . . . . . . . . . . . . .
Auto-clamping: When you reduce Steps, Pulses and Start On are automatically clamped to valid ranges. For example, reducing Steps from 16 to 8 clamps Pulses from 12 to 8 and Start On from 10 to 8.
Groove Tools
Swing
Per-channel swing timing based on the Roger Linn algorithm.
- Range: -99 to +99
- Default: 0 (straight timing)
- Positive values delay the off-beat 16th notes, creating a classic shuffle/swing feel
- Negative values push the off-beat 16th notes earlier, creating a rushing feel
- Higher absolute values produce more pronounced swing
Shift
Per-channel time delay that moves notes forward or backward in time.
- Range: 0–126 (63 = center/off)
- Default: 63 (no shift)
- Values below 63: notes play earlier
- Values above 63: notes play later
Shift is processed after the Linear Drumming Matrix — only winning notes are shifted.
Humanize
Per-channel random timing variation that adds a human feel.
- Range: 0–127
- Default: 0 (no humanization)
- Higher values add more random timing offset to each note
Clock Divider
Per-channel tempo multiplier/divider that changes the playback speed of each instrument independently.
18 ratios available, from /8 (8x slower) through x1 (normal, default) to x8 (8x faster): /8, /7, /6, /5, /4, /3, /2, /1.5, x1, x1.5, x2, x2.5, x3, x4, x5, x6, x7, x8.
Note Length
Global setting that controls how long each MIDI note lasts (the gap between NOTE ON and NOTE OFF).
| Setting | Duration |
|---|---|
| 4n | Quarter note |
| 8n | Eighth note |
| 16n | Sixteenth note (default) |
| 32n | Thirty-second note |
| 64n | Sixty-fourth note |
Velocity Tab
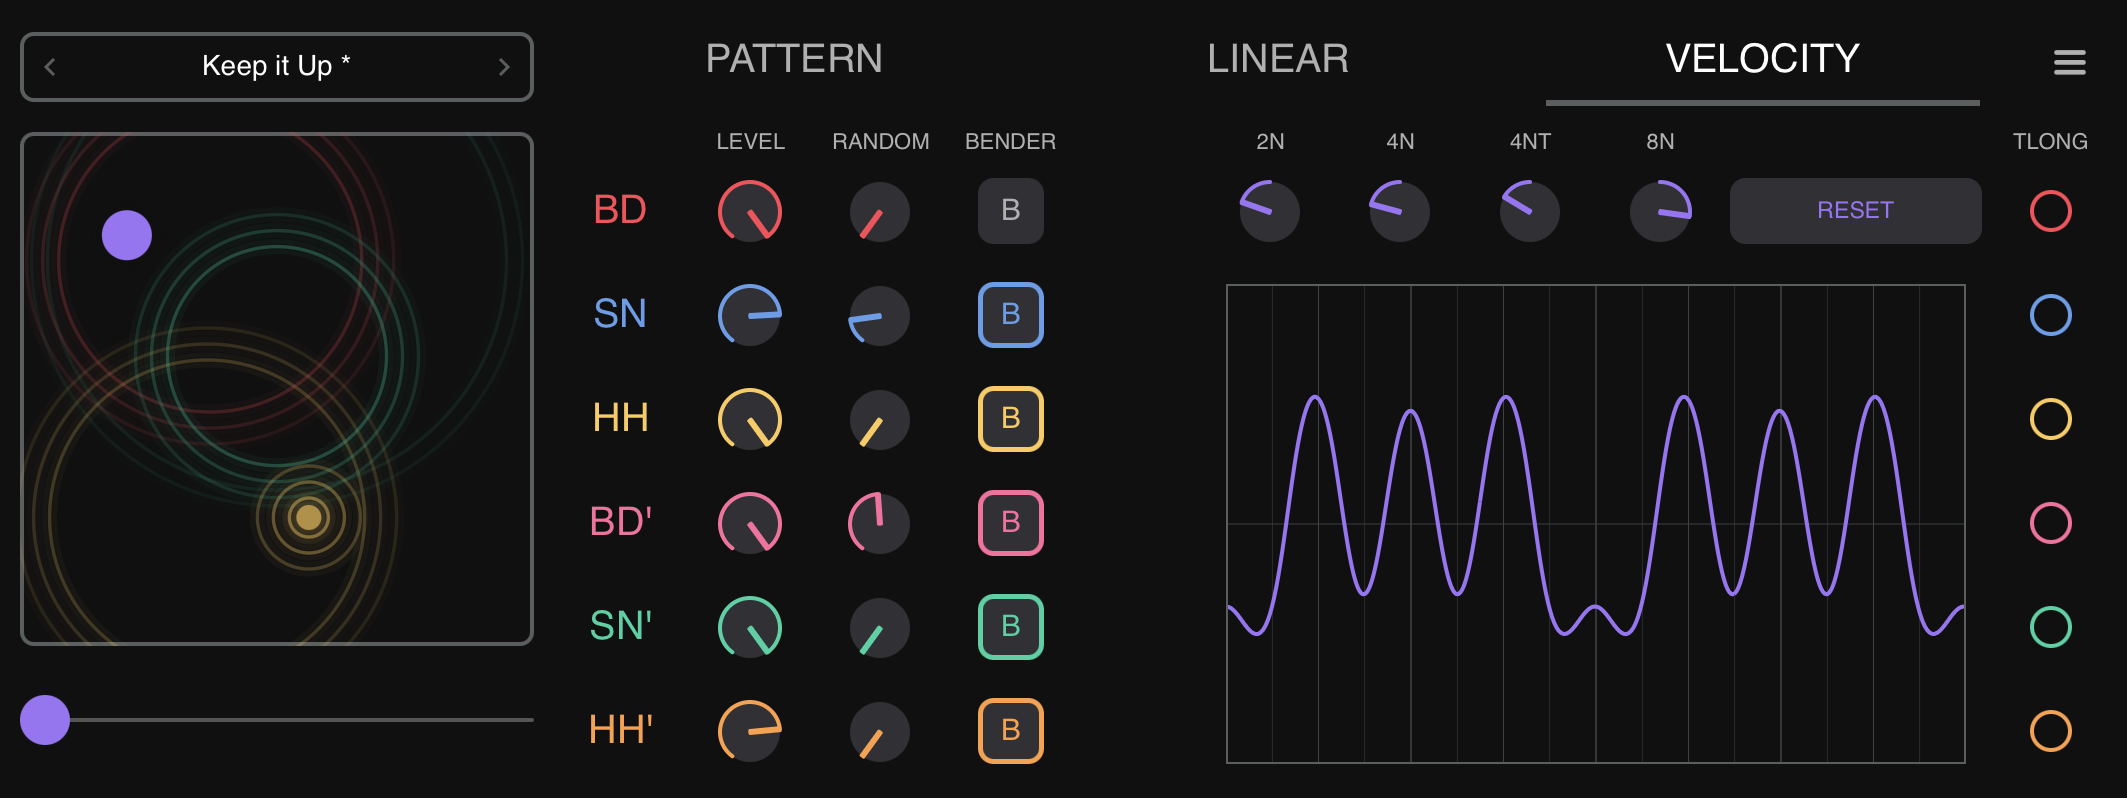
The VELOCITY tab controls the output velocity (volume/intensity) of each instrument's MIDI notes.
LEVEL
A per-channel velocity value that replaces the engine's velocity entirely. Whatever velocity the Grids or Euclidean engine produces is discarded; the LEVEL value is used instead.
- Range: 1–127
- Default: 120 for all channels
Velocity Randomization
Adds per-channel random variation around the LEVEL value.
- Range: 0–100%
- Default: 0% (no randomization)
- At 20%, a LEVEL of 100 would produce velocities roughly between 80 and 120
Velocity Bender
The Velocity Bender modulates velocity using a bar-synchronized LFO. It creates dynamic "breathing" accent patterns that evolve over time.
Instrument Enable Buttons
Each instrument row has a B (Bender) toggle button. Tap to enable or disable the Velocity Bender for that channel. All are enabled by default. Disabled instruments bypass the Velocity Bender and keep their LEVEL velocity.
Beat Division Knobs
Four bipolar knobs control how strongly each beat division contributes to the LFO curve:
| Knob | Beat Division | Description |
|---|---|---|
| 2n | Half note | Slow, wide modulation over 2 beats |
| 4n | Quarter note | Pulse-aligned modulation on every beat |
| 4nt | Quarter-note triplet | Triplet feel — 3 cycles per 2 beats |
| 8n | Eighth note | Fast modulation, twice per beat |
Each knob ranges from -1.0 to +1.0 with 0.0 at center (no modulation). Positive values create peaks, negative values create troughs at that division. The four components are blended into a single smooth LFO curve.
Waveform Display and Buttons
A real-time waveform display shows the combined LFO shape, updated at 30 FPS as you adjust knobs. Grid lines mark beat divisions for visual reference.
- RANDOM — randomizes all four knobs
- RESET — returns all knobs to center (0.0)
The Velocity Bender is the final velocity processing stage before MIDI output. It multiplies the LEVEL velocity by the LFO value, so the modulation is proportional.
Linear Tab
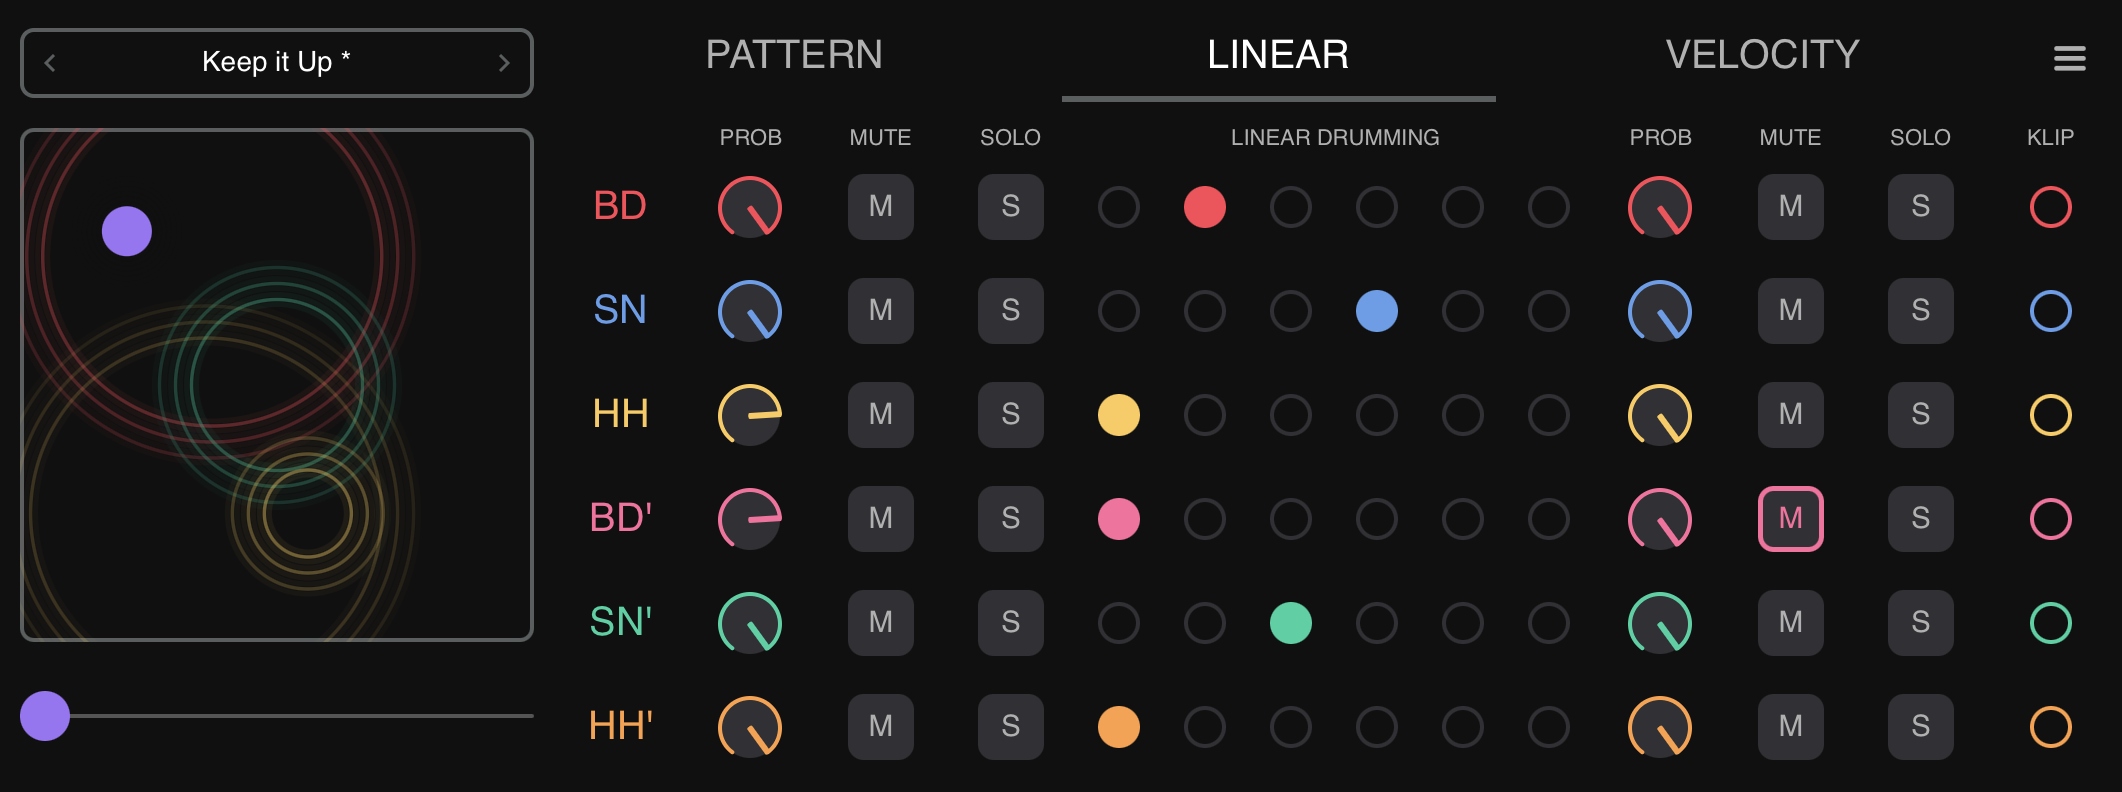
The LINEAR tab controls the MIDI signal flow through a 12-column matrix. It provides probability filtering, mute/solo controls, and a 6-level priority system for resolving simultaneous notes.
Signal Chain
Engine Output -> Probability Pre -> Mute Pre -> Solo Pre -> Linear Drumming Matrix -> Mute Post -> Probability Post -> Solo Post -> MIDI OutputControls on the left (Probability Pre, Mute Pre, Solo Pre) affect notes before priority processing. Controls on the right (Probability Post, Solo Post, Mute Post) affect notes after priority processing.
Probability Pre / Probability Post
Knobs (0–100%) that randomly filter notes.
- Probability Pre: Filters notes before priority processing. Removed notes are as if they never happened — other instruments fill naturally.
- Probability Post: Filters notes after priority processing. Creates gaps in the pattern.
- 100% (default): All notes pass through
- 50%: Roughly half the notes are randomly removed
- 0%: All notes blocked
When using both, probabilities multiply: Probability Pre=80% and Probability Post=50% means roughly 40% of notes survive.
Mute Pre / Mute Post
Toggle buttons that silence instruments.
- Mute Pre: Mutes before priority. Other instruments continue normally (no holes).
- Mute Post: Mutes after priority. Leaves holes where the instrument would have played.
- Mute Pre and Mute Post are mutually exclusive per instrument. Enabling one disables the other.
Solo Pre / Solo Post
Toggle buttons that isolate instruments.
- Solo Pre: When any Solo Pre is enabled, only Solo Pre-enabled instruments play. Bypasses priority filtering.
- Solo Post: Solos after priority processing. Shows gaps from priority muting.
- Solo Pre and Solo Post are mutually exclusive per instrument. Enabling one disables the other.
- If any solo is enabled, all non-soloed instruments are muted.
Linear Drumming Matrix
Determines which instrument wins when multiple notes trigger simultaneously.
- Each instrument has exactly one priority level. Left side = higher priority
- When notes collide, only the highest-priority instrument plays
- Lower-priority instruments are muted for the duration set by Linear Grid (see Settings Tab)
Same priority: If two instruments share the same priority level, both play at the same time. Setting all instruments to the same priority effectively disables priority filtering.
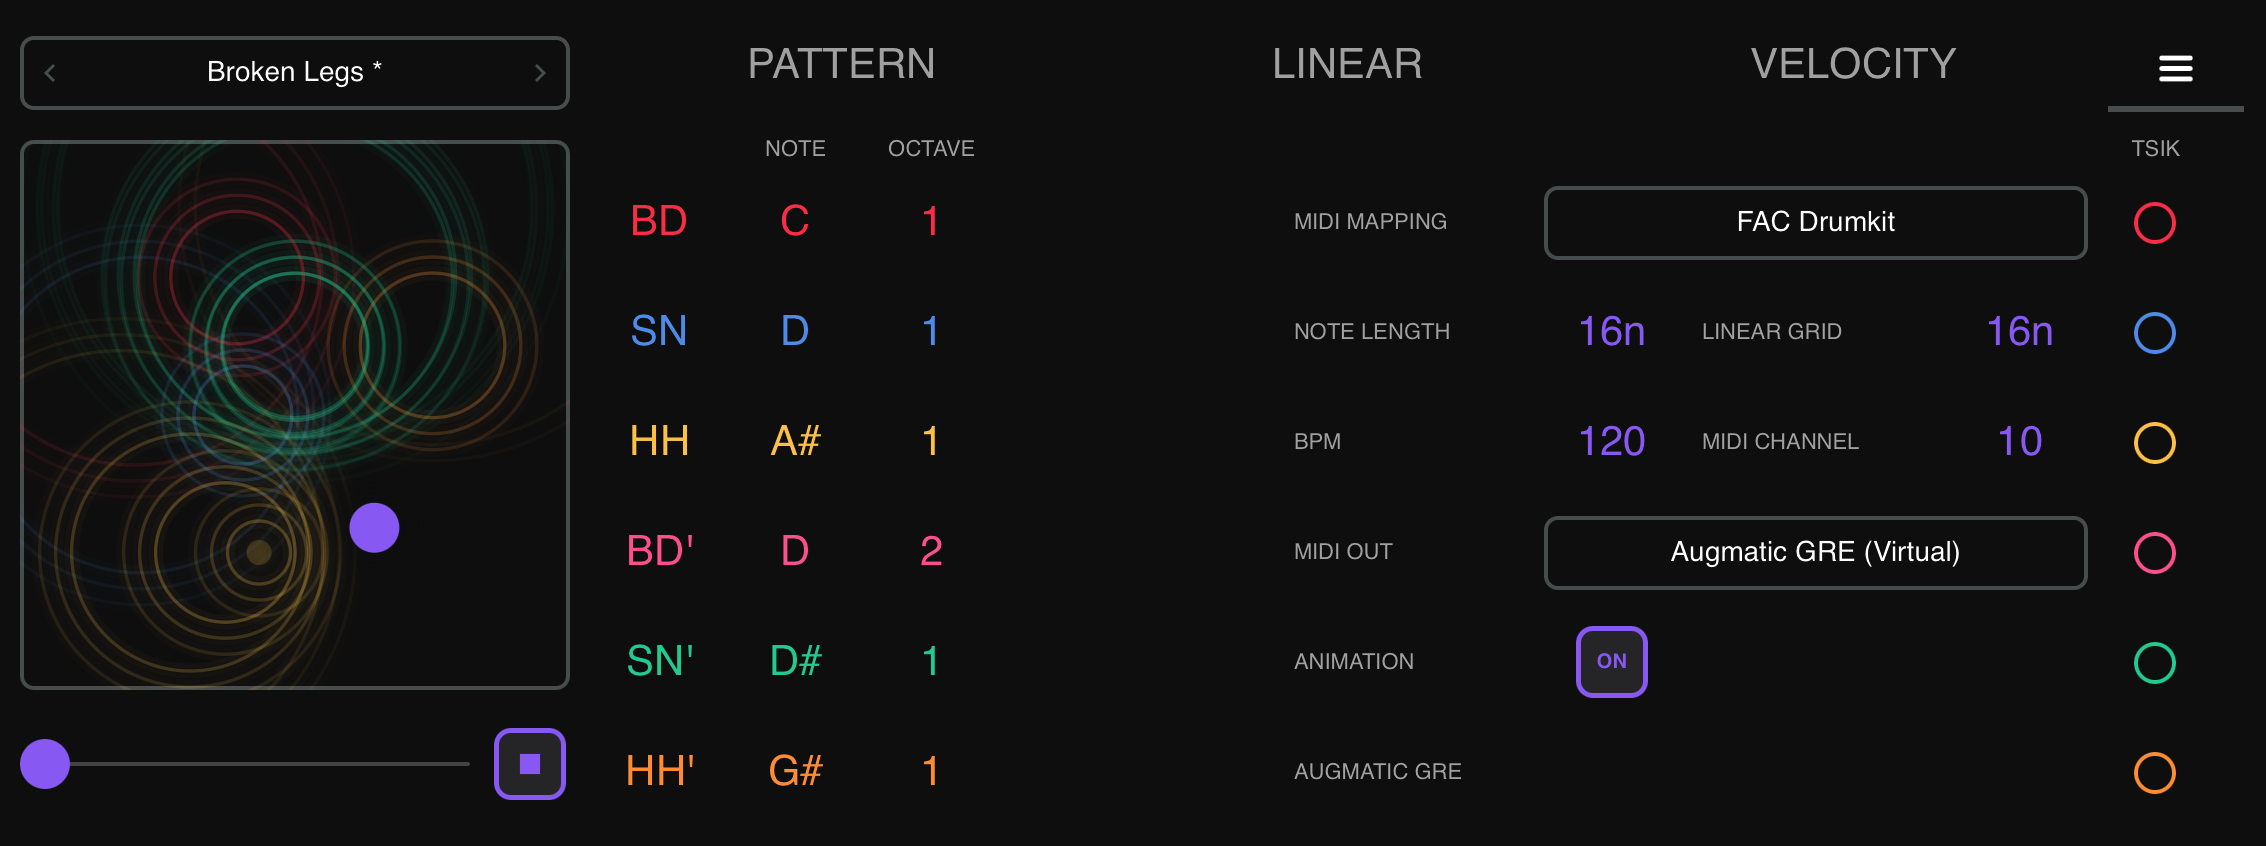
Settings Tab
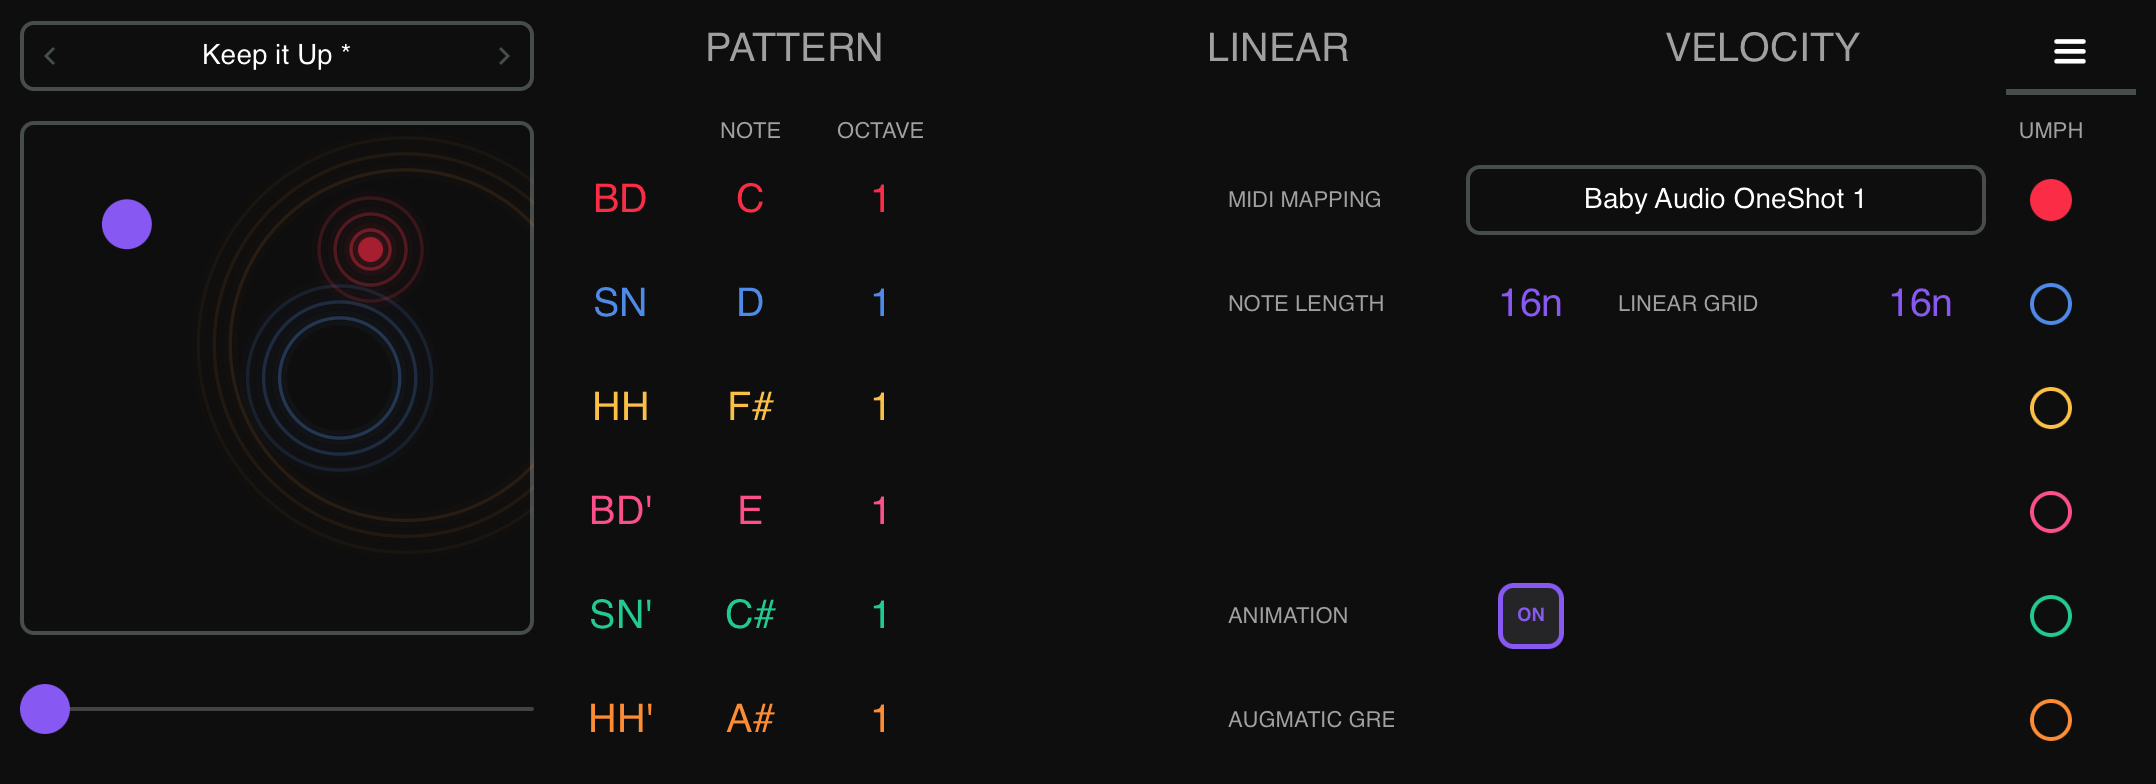
The SETTINGS tab manages MIDI note assignments, MIDI mappings, and custom instrument names.
MIDI Mapping System
MIDI mappings store note assignments independently from presets. This means you can load different presets (pattern settings) while keeping the same note assignments for your drum machine.
Loading a Mapping:
- Tap the MIDI Mapping panel
- A dropdown opens with available mappings
- Tap a mapping name to load it
- Or use the
</>chevron arrows to navigate
Saving a Mapping:
- Tap the MIDI Mapping panel to open the dropdown
- Tap "Save" to overwrite the current mapping, or "Save As" to create a new one
- Enter a name and confirm
Deleting a Mapping:
- Open the dropdown, tap "Delete"
- Confirm deletion
Organization: Place mapping XML files into subfolders within the MIDI Mappings directory for categorization. Subfolders appear as folder rows in the dropdown.
Factory Mappings: Built-in mappings are auto-installed on first launch.
Key principle: Loading a preset does NOT change MIDI notes. Loading a mapping does NOT change pattern settings. The two systems are completely independent.
Custom Instrument Names
You can rename the display labels for any instrument to give you a better clue what instrument is actually playing:
- Double-click (or double-tap on iPad) on any instrument label in the Settings tab
- A rename dialog appears with a text field (3 character max)
- Enter the new name and tap Save
Restore: Resets the channel to its factory default name (BD, SN, HH, BD', SN', HH').
Custom names are stored in MIDI mapping files. Renaming marks the current mapping as modified (shown with an asterisk). Save your mapping after renaming to persist the changes.
Preset System
Presets store all pattern, timing, velocity, and mix settings. They do NOT store MIDI note assignments (those are managed separately by MIDI Mappings).
Loading Presets
- Tap the Preset panel at the top-left of the interface
- A dropdown shows factory presets and user presets
- Tap a preset name to load it immediately
- Use
</>chevron arrows to navigate through presets
Saving Presets
- Configure all parameters as desired
- Open the Preset panel dropdown
- Tap "Save" (overwrite) or "Save As" (new preset)
- Enter a name and confirm
Randomize
The preset system includes a Randomize function that generates random values for all parameters. MIDI note assignments are excluded from randomization (they remain unchanged).
Factory vs User Presets
- Factory presets ship with the plugin, cannot be deleted
- User presets are stored as XML files and can be saved, deleted, and shared
- A modification indicator (asterisk) appears when the current preset has been edited since loading
What Presets Include
| Included | Not Included |
|---|---|
| Density, Chaos, Map X/Y | MIDI note assignments |
| Euclidean Steps/Pulses/Start On | MIDI channel (default Ch 10, configurable in standalone) |
| Blend, Swing, Shift, Humanize | MIDI output device |
| Clock Divider ratios | Custom instrument names |
| Velocity LEVEL, Randomization | |
| Velocity Bender settings | |
| Linear Drumming Matrix assignments | |
| Mute/Solo/Probability states | |
| Linear Grid, Note Length |
MIDI Signal Flow
The complete signal path from pattern generation to MIDI output:
Pattern Engine (Grids or Euclidean, selected by Blend)
    |
    v
Velocity Controller (LEVEL replaces velocity, applies Randomization)
    |
    v
Probability Pre (random filtering, pre-priority)
    |
    v
Mute Pre (pre-priority, no holes)
    |
    v
Solo Pre (pre-priority, full pattern)
    |
    v
Linear Drumming Matrix (resolves simultaneous notes)
    |
    v
Mute Post (post-priority, leaves holes)
    |
    v
Probability Post (random filtering, post-priority)
    |
    v
Solo Post (post-priority, with priority gaps)
    |
    v
Velocity Bender (LFO velocity modulation)
    |
    v
Shift / Humanize (time delay)
    |
    v
MIDI Output (Note On/Off on Channel 10)
DAW Automation
All 135 parameters are exposed to your DAW for automation.
| Group | Parameters | Per Channel |
|---|---|---|
| Pattern Morphing | Map X, Map Y | Global |
| Density | BD/SN/HH/BD'/SN'/HH' | Yes |
| Chaos | Master + 6 individual | Yes |
| Blend | Grids/Euclidean mix | Yes |
| Euclidean | Steps, Pulses, Start On | Yes |
| Swing | Timing offset | Yes |
| Shift | Time delay | Yes |
| Humanize | Random timing | Yes |
| Clock Ratio | Tempo multiplier | Yes |
| Velocity Level | Output velocity | Yes |
| Velocity Random | Randomization amount | Yes |
| Velocity Bender | Enable + 4 knobs | Per-instrument + global |
| Probability | Probability Pre, Probability Post | Yes |
| Mute | Mute Pre, Mute Post | Yes |
| Solo | Solo Pre, Solo Post | Yes |
| Priority | Level 1–6 | Yes |
| MIDI Notes | Note number | Yes |
| Note Length | Length | Global |
| Linear Grid | Duration | Global |
Tips and Workflows
Creating Evolving Patterns
Automate Map X and Map Y over 8–16 bars to morph through different pattern styles. Start with subtle movements near one grid point, then sweep across the full range for dramatic changes.
Humanizing Rigid Patterns
- Set per-channel Chaos to 5–15 for subtle timing variations
- Add Velocity Randomization at 10–20% for dynamic variation
- Use Humanize at 10–30 for micro-timing offsets
- Apply Swing at 10–30 for groove feel
Linear Drumming
Use the Linear Drumming Matrix to create patterns where only one voice plays at a time:
- Assign SN to Priority 1, BD to Priority 2, HH to Priority 3
- Set Linear Grid to 16n or 8n
- When notes collide, only the highest-priority instrument plays
- Lower-priority instruments are silenced for the grid duration
Combining Grids and Euclidean
Use the Blend control to mix engines per channel:
- BD on Grids, HH on Euclidean: Set BD Blend to 0.0, HH Blend to 1.0
- Gradual transition: Automate Blend from 0.0 to 1.0 over several bars
- Random switching: Set Blend to 0.5 for each note to randomly come from either engine
Setting Up Accent Layers
- Keep accent channel densities (BD', SN', HH') low (10–25)
- Assign different MIDI notes to accents (e.g., BD=C0, BD'=D0 for rimshot)
- Give accents lower priority (4–6) so they yield to main hits
- Use the Velocity Bender to modulate accent velocity over time
Polyrhythms with Euclidean
Assign different step counts to different channels:
- BD: E(4,16) Start On=1 — standard 4-on-the-floor
- SN: E(3,8) — Tresillo pattern
- HH: E(7,12) — West African bell
Combined with different Clock Divider ratios, this creates complex polyrhythmic textures.
Sparse and Generative Patterns
- Lower Probability Pre to 40–60% for all channels
- Set moderate Chaos (30–50)
- Use different Euclidean patterns per channel with odd step counts
- Set Linear Grid to 4n for pronounced priority gaps
- Enable Velocity Bender with random knob values
Standalone Mode
Augmatic GRE can run as a standalone app on both macOS and iPad, independent of any DAW. In standalone mode, the app provides its own internal clock and MIDI output routing. The standalone mode is sufficient to control one drum sampler or synthesizer, but for setups which include several time-synchronized instruments, we recommend using a host app which will manage clock synchronization, MIDI CC mapping etc.
AUv3 vs Standalone
| Feature | AUv3 Plugin | Standalone App |
|---|---|---|
| Transport | Controlled by the host DAW — Play/Stop, timeline position | Internal Play/Stop button and Spacebar shortcut (macOS) |
| BPM | Synced from host — no BPM control visible | Adjustable on Settings tab (40–240 BPM) |
| MIDI Output | Routed through the host's MIDI bus | Selectable on Settings tab — virtual port or hardware MIDI device |
| MIDI Channel | Fixed to Channel 10 (GM Drums) | Selectable on Settings tab (1–16, default 10) |
| Play/Stop button | Hidden — host controls transport | Visible to the right of the Master Chaos slider |
| DAW Automation | All 135 parameters exposed to host | Not available |
Transport Controls (Standalone Only)
In standalone mode, the app has its own transport since there is no host DAW to provide one:
- Play/Stop button — appears to the right of the Master Chaos slider. Click to start/stop the internal clock. This button is not available when running as an AUv3 plugin.
- Spacebar shortcut (macOS) — toggles playback
In AUv3 mode, transport is fully controlled by the host: press Play in your DAW and Augmatic GRE starts generating patterns. BPM, timeline position, and play/stop state all sync automatically.
Settings Tab Differences
The Settings tab shows additional controls in standalone mode that are not available when running as an AUv3 plugin:
| Control | Description |
|---|---|
| BPM | Internal tempo, 40–240. Scroll/drag to change. In AUv3 mode, BPM is provided by the host. |
| MIDI CHANNEL | Output channel 1–16, default 10 (GM Drums). In AUv3 mode, output is fixed to Channel 10. |
| MIDI OUT | Select output device: virtual port or hardware MIDI. In AUv3 mode, MIDI is routed through the host. |
BPM is saved in presets, but only used in Standalone Mode. MIDI channel and output device are persisted independently.
macOS Standalone
- Window opens at 1200 × 444 with 2.7:1 aspect ratio
- Resizable (600–1920 width) with native macOS title bar
File Storage
Presets and MIDI mappings are stored as XML files in platform-specific directories. Factory content (shipped with the app) and user-created content are kept in separate subdirectories so that app updates never overwrite or delete your custom presets.
iOS / iPadOS
On iOS, presets and MIDI mappings are stored in the app's Documents directory, visible in the Files app under On My iPad > Augmatic GRE.
- Factory Presets:
Documents/Presets/Factory/ - User Presets:
Documents/Presets/User/ - Factory MIDI Mappings:
Documents/MIDI Mappings/Factory/ - User MIDI Mappings:
Documents/MIDI Mappings/User/
You can browse, copy, and share these files directly from the iOS Files app. To import a preset someone shared with you, simply drop the XML file into the appropriate User/ folder.
AUv3 — Files App Access
When running as an AUv3 plugin inside a host (AUM, Cubasis, Drambo, etc.), the plugin needs permission to access the standalone app's Documents folder. On first use, a blue “Enable Files App Access” button appears at the top of the plugin interface.
- Tap the button
- A folder picker opens, pre-navigated to the Augmatic GRE Documents folder
- Tap Open to grant access
After this one-time setup, presets you save in the AUv3 are immediately visible in the Files app — no need to launch the standalone app. The permission persists across app restarts and device reboots.
If you skip this step, the AUv3 still works normally but uses an internal storage area not visible in the Files app.
macOS
- Factory Presets:
~/Library/Application Support/Audio/Presets/Artur Nowak/AugmaticGRE/Presets/Factory/ - User Presets:
~/Library/Application Support/Audio/Presets/Artur Nowak/AugmaticGRE/Presets/User/ - Factory MIDI Mappings:
~/Library/Application Support/Audio/Presets/Artur Nowak/AugmaticGRE/MIDI Mappings/Factory/ - User MIDI Mappings:
~/Library/Application Support/Audio/Presets/Artur Nowak/AugmaticGRE/MIDI Mappings/User/